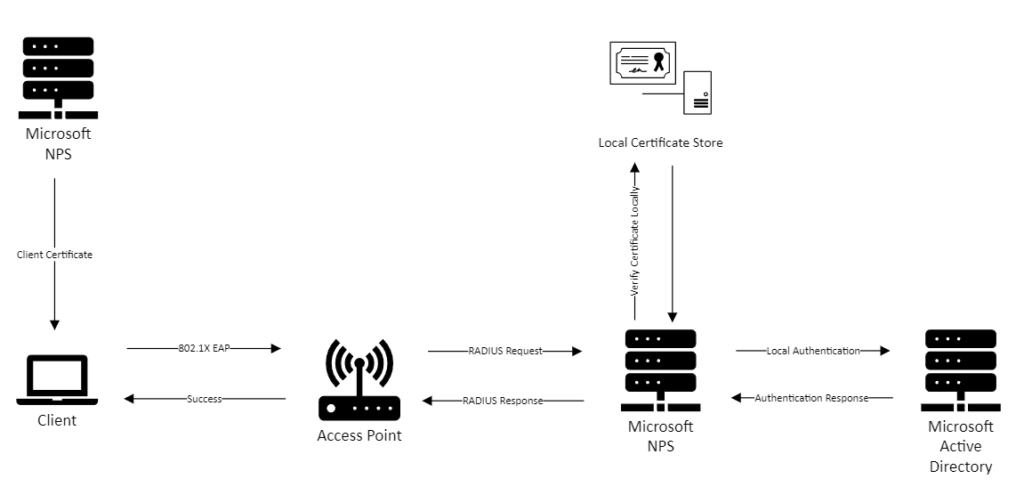
Somewhat recently, I created a wireless network that allowed for 802.1x authentication using both machine and user certificates utilizing Microsoft NPS as a RADIUS server and a Microsoft Certificate Authority which distributed said certificates through group policy auto-enrollment. Everything worked great, that is, until the need to allow Microsoft Entra joined devices was brought up.
The Problem
There is a big shift for businesses to move toward a hybrid or cloud only environment in the past years. However, there are some configurations that only seem to work with on-premise infrastructure that dont have an existing solution in an Azure or other cloud environment.
The reason that this configuration works on-premise is because of the authentication flow and how Microsoft NPS works:

Microsoft NPS when it receives the RADIUS request will try to assign a network policy if it meets the criteria set in the policy itself. When it checks the client certificate, it looks up the identity in Active Directory.
This is where the problem lies, Microsoft Entra Joined devices do not exist in Active Directory so there is no way to validate the certificate machine identity with Microsoft NPS. User certificates, however work just fine in hybrid scenarios.
There are numerous forum posts and threads related to this topic and the consensus is generally that there is no comparable solution for Microsoft NPS for use to identify Microsoft Entra machines. The only workaround, which I did not like, was to create "ghost" computer objects in Active Directory for all Microsoft Entra joined machines. That felt sloppy, and came with administrative overhead to create custom scripts to read devices missing from Active Directory from Entra ID and copy them over.
I spent hours trying to locate the right solution, I found it hard to believe no one solved this problem. I nearly gave up, but then realized I was searching for the wrong answer the entire time.
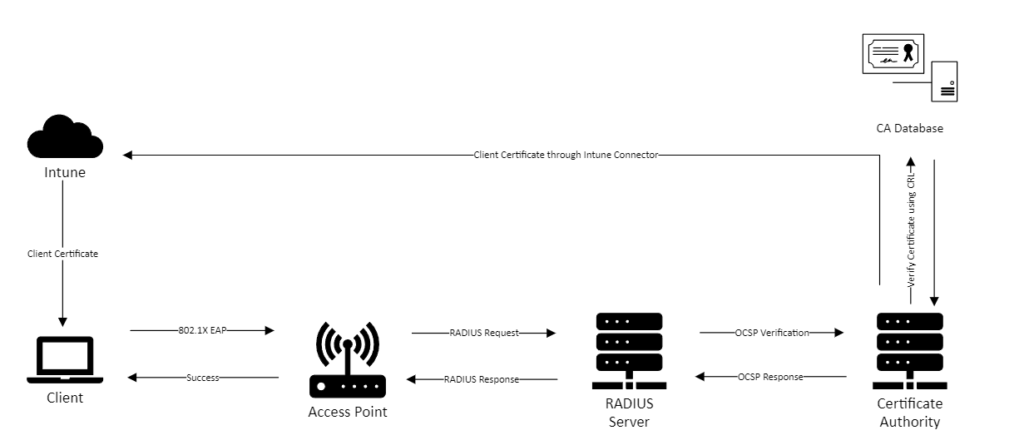
Microsoft NPS will not work with Microsoft Entra joined devices. This is true, and there is no existing solution at this time that can make Microsoft NPS work that way. However, if you nix Microsoft NPS, and use a different RADIUS server solution entirely, you can solve this without a problem. Microsoft NPS looks inside Active Directory for users and computers because that is how it is designed when authenticating users on itself. Using a third party RADIUS server, you can instead rely only on validating the authenticity of the client certificate.
In my case I used a network access control appliance (NAC) to act as a RADIUS server, and forwarded all requests from our access points to the new RADIUS server. I redesigned the internal PKI infrastructure, implemented OCSP, deployed new certificates, and everything worked!
Pre-Requisites
- Internal Public Key Infrastructure (Minimum two tier recommended Offline/Online)
- Microsoft Intune
- Third-Party RADIUS Server
Guide
STEP ONE: Prepare your Public Key Infrastructure (PKI)
The first thing you need to distribute certificates is of course a Certificate Authority (CA). The easiest thing to do would be to spin up your preferred version of Microsoft Windows Server and install the Certificate Authority role. While I won't go into detail of how exactly to configure the CA itself, I recommend implementing at minimum a two-tier PKI setup with one offline non-domain joined root CA and an online enterprise CA. There are many guides out there how to configure a CA properly, and if I write one in the future I will update this with a reference to it.
For Intune to be able to distribute certificates you will need to install and configure the Microsoft Intune Certificate Authority Connector:
Install the Certificate Connector for Microsoft Intune | Microsoft Learn
You will need the following certificate templates published
- OCSP Response Signing
- Machine Certificate
For all certificates, it is recommended to at minimum use an RSA 2048 key size
- Open the "Certificate Authority" console and go to "Certificate Templates", right-click and then "Manage".
- Go under the properties for "OCSP Response Signing".
- Under Security, add the computer name of the CA that will be signing OCSP responses and ensure it has read/enroll/autoenroll permissions. Click "OK".
- Right Click the "Computer" template and click "Duplicate Template".
- Go under the properties of the newly duplicated User template.
- Under "Security", add the computer name of the CA and ensure it has read/enroll/autoenroll permissions. If there are entries for Domain Computers or Authenticated Users, remove them.
- Under "Subject Name", ensure "Supply in the request" is selected.
The CA will also need the OCSP Responder role installed and configured as well.
- From Server Manager go to "Add Roles and Features" and install the OCSP Responder role.
- Once complete open "Online Responder Management" and right click "Revocation Configuration" and click "Add Revocation Configuration".
- Follow the wizard for creating a Revocation Configuration, specifying a friendly name and associating the CA certificate to the configuration and for signing OCSP responses.
- Right-click the new Revocation Configuration and select "Properties" go under "Signing" and check "Enable NONCE extension support.
- In the "Certificate Authority" console, go under "Properties" of the CA, go to "Extensions", select "Authority Information Access (AIA)" from the drop-down and add "http://<ServerDNSName>/ocsp" into the list and check "Include in the online certificate status protocol (OCSP) extension". Ensure this is unchecked for all other entries.
STEP TWO: Configure Third-Party RADIUS Server
This step depends on what RADIUS server solution you intend to use. We happened to have an internal network access control (NAC) solution that allowed us to use it as a RADIUS server. You can elect to use a free solution such as FreeRADIUS or some vendors may have similar solutions such as Aruba ClearPass.
The generalized steps to configure a RADIUS server are as follows:
- Install and enable RADIUS service
- Configure authentication port and accounting port listeners
- Configure client certificate for the RADIUS server (Can be generated from internal PKI)
- Enable OCSP checking.
STEP THREE: Configure Intune Policies
Create a device configuration to deploy the Trusted Root CA certificate to all devices.
- Under Devices - Configuration, Create a new policy, select profile type "Templates", and select "Trusted Certificate".
- Import the certificate for the Trusted Root CA and select "Root" as the Destination Store.
Create a device configuration to deploy Machine certificates.
- Under Devices - Configuration, Create a new policy, select profile type "Templates", and select "PKCS Certificate".
- Include the following details.
- Validity Period : <Match the templates settings>
- Key Storage Provider : Enroll to TPM KSP if present otherwise Software KSP.
- Certification Authority : <Online CA FQDN>
- Certificate Template Name : <Name of Certificate Template for Custom Machine Template>1
- Subject Name Format : "CN={{DeviceName}}"
- Subject Alternative Names : "User Principal Name" - "{{DeviceName}}"
1Note that Certificate Template Names differ from their Friendly Names and have spaces stripped (i.e. "Certificate Template" would actually be "CertificateTemplate")
Create a device configuration to deploy wireless profile to all devices.
- Under Devices - Configuration, Create a new policy, select profile type "Templates", and select "Wi-Fi"
- Include the following details.
- Wi-Fi type : Enterprise
- W-Fi name (SSID) : <SSID from wireless controller>
- Connection Name : <Your choice for a custom profile name>
- Authentication Mode : Machine
- EAP type : EAP - TLS
- Certificate server names : <FQDN of RADIUS Server>
- Root certificate for server validation : <Select Root CA Certificate deployment configuration>
- Authentication Method : PKCS certificate
- Client certificate for client authentication : <Select Machine certificate deployment configuration>
- Root certificate for client authentication : <Select Root CA Certificate deployment configuration>
After all of these steps are completed everything should be working and you should have the following:
- Internal PKI acting as an OCSP responder and configured to create machine certificates.
- Microsoft Intune distributing machine client certificates and trusted root certificates.
- Third-party RADIUS server handling requests and performing OCSP checking on client certificates against internal PKI.
- Custom wireless profile distributed to all computers using 802.1x machine authentication.

I hope this saves someone a lot of time searching or at the least points them in the right direction.